

The easiest glueless wig styles for beginners are sleek straight, high ponytail, half-up half-down, messy bun, and headband/turban looks. All five can be done in under 15 minutes using a glueless cap with adjustable straps, combs, and pre-cut HD lace. No adhesive. No salon appointment. Just a secure fit and a style that looks intentional.
Here is a fast reference before we go deeper:
Quickest styles by difficulty and time:
- Sleek straight — Beginner | 5–10 min
- Headband or turban wrap — Beginner, with very short styling time
- Half-up half-down — Beginner | 10–15 min
- High ponytail — Beginner | 10–15 min
- Messy or low bun — Beginner | 10–15 min
- Voluminous curls — Beginner+ with somewhat longer styling time
- Braided headband — Beginner+ with somewhat longer styling time
- Braided ponytail — Intermediate with longer styling time
- Wig with baby hairs — Intermediate with longer styling time
- Bantu knots — Intermediate with longest styling time
Three things make these looks work reliably: HD lace for an undetectable hairline, a density of medium for everyday styles or higher density for fuller updos, and a quick preview on Stylemycrown before you buy so you know the hairline and texture suit your face.
Key Takeaways
The most reliable glueless wig styles for beginners are sleek straight, half-up half-down, and headband looks, all achievable in under 15 minutes with a pre-cut lace cap, adjustable straps, and edge control.
| Point | Details |
|---|---|
| Easiest styles first | Sleek straight, headband wrap, and half-up half-down take under 15 minutes with no adhesive. |
| Match density to style | Use 150% for everyday looks, 180% for updos, and 200% for voluminous or dramatic styles. |
| Secure without glue | Elastic bands, combs, silicone wig-grip, and drawstrings hold a glueless cap firmly in place. |
| Care extends wig life | Detangle before washing, use sulfate-free shampoo, air dry on a stand, and store in a satin bag. |
| Try before you buy | Stylemycrown offers 528+ curated hairstyles and 10 free credits to preview styles on your own photo. |
Table of Contents
- What are the best glueless wig styles for beginners?
- How do glueless wigs stay on without glue?
- How to install a glueless wig step by step
- What heat settings and tools work on glueless wigs?
- How do you wash and store a glueless wig to make it last?
- Common glueless wig problems and how to fix them fast
- How virtual try-on helps you choose the right glueless wig style
- The fastest wins for beginners are also the most underrated
- See your glueless wig style on your own face before you buy
- Sources
What are the best glueless wig styles for beginners?
Ten looks. Each one paired with a 3-step recipe, a tools list, and a time estimate. These are ordered from easiest to most skilled, based on validated style lists and real cap-type requirements.
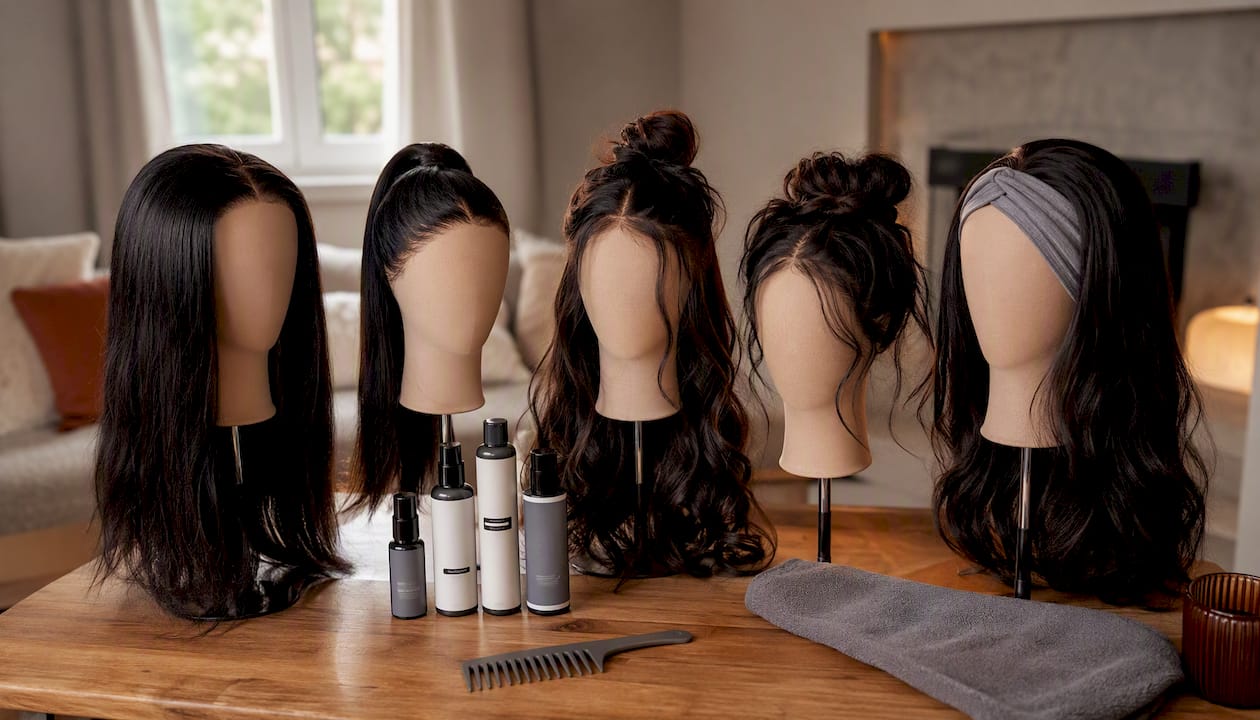
Wig density guide
Before the style list, match your density to your intended look:
| Density | Fullness Level | Best For |
|---|---|---|
| Medium density | Medium, natural | Sleek styles, everyday wear, bobs |
| 180% | Medium-high, full | Updos, ponytails, half-up looks |
| Ultra-thick density | Ultra-thick, dramatic | Voluminous curls, Bantu knots, performance styles |
Source: Unruly's glueless wig guide
1. Sleek Straight Difficulty: Beginner | Time: 5–10 min | Cap: Any (closure 5x5 works great)
What it looks like: hair falls flat and smooth from root to tip, parted down the middle or side.
- Prep: Lay your natural hair flat under a wig cap; smooth the wig with a paddle brush.
- Secure: Tighten the elastic band and press the combs into place at the nape and temples.
- Finish: Apply a small amount of edge control along the hairline and lay with a soft brush.
Tools: Paddle brush, edge control, rat-tail comb, wig cap.
2. Headband or Turban Wrap Difficulty: Beginner | Time: 5 min | Cap: Headband wig or any glueless cap
What it looks like: a wide headband or wrapped fabric covers the hairline completely, so lace blending is not required.
- Prep: Put on a wig cap and place the wig so the headband sits at your natural hairline.
- Secure: Adjust the internal combs or elastic band; press the headband flat.
- Finish: Style the remaining hair into loose waves or a puff behind the band.
Tools: Wide headband or fabric wrap, wig cap.
3. Half-Up Half-Down Difficulty: Beginner | Time: 10–15 min | Cap: Lace front 13x4 or closure 5x5
What it looks like: the top section is pulled back into a small bun or puff; the rest flows down freely.
- Prep: Brush the wig smooth; section the top half with a rat-tail comb.
- Secure: Gather the top section and tie with a snag-free elastic; check that the wig cap has not shifted.
- Finish: Smooth the hairline with edge control; pull a few face-framing pieces loose.
Tools: Rat-tail comb, snag-free elastic, edge control, bobby pins.
4. High Ponytail Difficulty: Beginner | Time: 10–15 min | Cap: Full-lace or 13x6 lace front (for a clean perimeter)
What it looks like: all hair is gathered high on the crown, leaving the nape and sides exposed.
- Prep: Brush all hair upward; use a wig grip or silicone strip to prevent slippage before pulling tight.
- Secure: Tie with a snag-free elastic; wrap a small section of hair around the base to hide the band.
- Finish: Smooth flyaways with a light-hold gel; lay edges with a brush.
Tools: Wig grip, snag-free elastic, light-hold gel, edge brush.
5. Messy or Low Bun Difficulty: Beginner | Time: 10–15 min | Cap: Any glueless cap
What it looks like: hair is loosely gathered at the nape or mid-back, with intentional texture and a few pieces left out.
- Prep: Mist the wig lightly with water or a refresher spray to add grip to the hair.
- Secure: Gather hair loosely, twist, and pin with bobby pins; do not over-tighten.
- Finish: Pull a few strands out around the face for a relaxed finish.
Tools: Bobby pins, light-hold spray, rat-tail comb.
6. Voluminous Curls
What it looks like: full, bouncy curls that frame the face with volume and movement.
- Prep: Shake the wig to separate curls; apply a curl-defining cream or mousse.
- Secure: Fit the wig, tighten the band, and press combs in; check that the hairline sits naturally.
- Finish: Scrunch sections upward to revive curl shape; diffuse briefly if the wig is human hair.
Tools: Curl cream or mousse, diffuser (human hair only), wide-tooth comb.
7. Braided Headband Difficulty: Beginner+ | Time: 15–20 min | Cap: Lace front 13x4 or closure
What it looks like: a cornrow or flat-braid runs along the hairline like a headband, with the rest of the hair left down.
- Prep: Part a thin section along the front hairline; braid or cornrow it back toward the ear.
- Secure: Pin the braid flat with bobby pins; adjust the wig so the lace sits behind the braid.
- Finish: Smooth the remaining hair and apply edge control to blend the braid into the wig.
Tools: Rat-tail comb, bobby pins, edge control, small rubber bands.
8. Braided Ponytail Difficulty: Intermediate | Time: 20–30 min | Cap: Full-lace preferred
What it looks like: a sleek or textured braid gathered at the nape or crown, often with a wrapped base.
- Prep: Brush all hair back; secure the wig with a wig grip for extra hold before braiding.
- Secure: Braid the gathered hair and tie the end; wrap a small section around the base.
- Finish: Smooth the hairline and edges; apply a light shine serum to the braid.
Tools: Wig grip, snag-free elastic, shine serum, edge control.
9. Wig With Baby Hairs Difficulty: Intermediate | Time: 20–30 min | Cap: Lace front 13x4 or 13x6 with pre-plucked hairline
What it looks like: delicate, styled baby hairs frame the forehead, making the wig look like it grew from the scalp.
- Prep: Use a fine-tooth comb or toothbrush to pull a thin section of lace hair forward.
- Secure: Apply edge control to the baby hairs and lay them in swirls or curves with a brush.
- Finish: Set with a light-hold gel and a piece of satin cloth pressed gently over the edges.
Tools: Toothbrush or edge brush, edge control, light-hold gel, satin cloth.
10. Bantu Knots
What it looks like: small, coiled knots pinned across the head in a geometric pattern.
- Prep: Section the wig into equal parts using a rat-tail comb; mist each section lightly.
- Secure: Twist each section tightly, coil it into a knot, and pin with bobby pins.
- Finish: Smooth the hairline and any exposed lace; apply edge control around the perimeter.
Tools: Rat-tail comb, bobby pins, light mist spray, edge control.
How do glueless wigs stay on without glue?
The short answer: cap construction does the work. Glueless wigs rely on a combination of mechanical fasteners and cap design rather than any adhesive. Understanding what is inside the cap helps you choose the right one for your lifestyle and the style you want to wear.
The main securing options:
- Adjustable elastic band: runs along the perimeter inside the cap; tighten or loosen with a small hook or drawstring. Comfortable for daily wear.
- Combs and clips: sewn into the front, nape, and sides; grip the wig cap or natural hair underneath. Fast to install, easy to remove.
- Silicone wig-grip band: worn separately around the head before the wig goes on; creates friction that holds the wig in place without touching the hairline.
- Drawstring: a cord at the nape that cinches the cap snugly. Common in ponytail wigs and some closure units.
Common cap types and what they allow:
- 5x5 or 7x6 closure cap: lace covers only the top/part area; great for sleek styles and everyday wear. Less lace to blend.
- 13x4 or 13x6 lace front: lace spans the full front hairline; opens up updos, side parts and baby-hair styling.
- Full-lace cap: lace covers the entire head; maximum styling freedom including high ponytails and Bantu knots. Usually the highest price point, with human-hair glueless options often ranging from about $90 to $350 depending on density and cap size.
Pro Tip: If your head size falls between standard cap sizes, adjust the elastic straps first and add a silicone wig-grip before you consider trimming or permanently altering the lace. A grip band adds friction without pressure.
How to install a glueless wig step by step
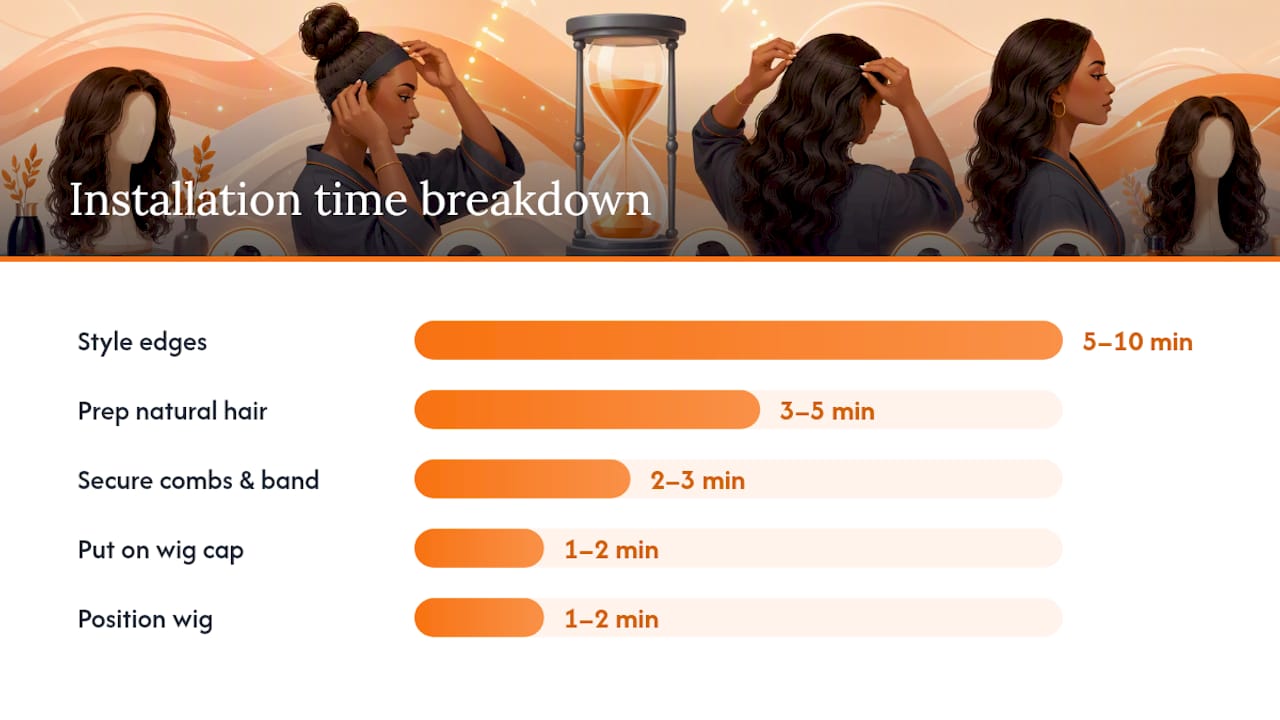
Pre-everything glueless units (pre-cut lace, pre-bleached knots, pre-plucked hairline) cut setup time dramatically. A beginner can go from box to styled in 15–20 minutes with the right prep.
Before you start, gather:
- Wig cap (nylon or mesh)
- Rat-tail comb
- Edge control or light-hold gel
- Bobby pins
- Silicone wig-grip (optional but recommended)
- Mirror (handheld + wall)
Step-by-step installation:
- Prep your natural hair (3–5 min). Braid, flat-twist, or wrap your hair flat against your head. The flatter the base, the more natural the wig sits.
- Put on a wig cap (1–2 min). Pull a nylon or mesh cap over your hair, aligning the front edge with your natural hairline. Tuck in any edges.
- Add a wig grip if using one (1 min). Place the silicone band over the wig cap, centered at your hairline. This step alone prevents most slippage.
- Position the wig (1–2 min). Hold the wig by the ear tabs and place it front-to-back, aligning the front lace with your natural hairline. Do not pull it too far back.
- Secure the combs and band (2–3 min). Press the front and side combs into the wig cap. Tighten the elastic band or drawstring at the nape until the wig feels snug but not tight.
- Check movement and pressure (1 min). Shake your head gently. If the wig shifts, tighten the band slightly. If you feel pressure at the temples or forehead, loosen it. Comfort is the goal.
- Style edges and hairline (5–10 min). Apply edge control with a brush, lay baby hairs if desired, and blend the lace with a concealer or foundation one shade lighter than your skin.
Safety reminder: Never tighten the band to the point of a headache. Consistent over-tightening can stress the hairline. Snug is not the same as tight.
What heat settings and tools work on glueless wigs?
Human hair wigs can be heat-styled with the same tools you would use on natural hair, provided you use a heat protectant every time. Most synthetic fibers cannot tolerate direct heat unless the label specifically says "heat-friendly" or "heat-resistant."
Temperature guidelines:
- Human hair: flat iron or curling wand at 300°F–375°F (150°C–190°C). Stay at the lower end for fine or color-treated hair.
- Heat-friendly synthetic: 250°F–300°F (120°C–150°C) maximum. Test a hidden strand first.
- Standard synthetic: no direct heat. Use flexi rods, perm rods, or steam styling only.
Dos:
- Apply a heat protectant spray to human hair before every heat session.
- Use a wide-tooth comb to detangle before applying any tool.
- Work in small sections for even heat distribution.
- Let the hair cool completely before brushing out a curl or wave.
Don'ts:
- Never use a flat iron above 400°F on any wig fiber, including human hair.
- Do not apply heat to wet or damp hair.
- Avoid daily heat on the same sections; rotate your styling approach.
Product checklist:
- Heat protectant spray (for human hair)
- Flat iron or curling wand with adjustable temperature
- Wide-tooth comb
- Microfiber towel (for blot-drying before any heat)
- Perm rods or flexi rods (for heat-free curl setting on synthetic)
How do you wash and store a glueless wig to make it last?
Regular, gentle care adds months to a wig's life. The routine is simple: detangle before washing, use cool water, condition generously, and air dry on a stand.
Washing routine:
- Detangle first. Use a wide-tooth comb or your fingers, working from the ends upward. Never start at the root.
- Rinse in cool or lukewarm water. Hot water loosens the weft and disrupts curl patterns.
- Shampoo gently. Apply a sulfate-free shampoo in a downward motion along the hair shaft. Do not scrub in circles.
- Condition. Apply a lightweight leave-in or rinse-out conditioner from mid-shaft to ends. Let it sit for 3–5 minutes.
- Rinse thoroughly. Residue buildup causes frizz and dullness.
- Blot dry. Press a microfiber towel gently against the hair. Never rub.
- Air dry on a wig stand. Keep the wig away from direct sunlight and heat sources while drying.
Storage tips:
- Store on a wig stand or mannequin head to preserve the cap shape.
- Use a satin bag for travel or long-term storage; satin reduces friction and prevents tangling.
- Keep away from humidity and direct sunlight.
Pro Tip: Between washes, refresh the wig with a light water-and-conditioner mist or a dry-shampoo-style spray. For curly or wavy textures, a quick steam refresh (using a handheld steamer held 6–8 inches from the hair) restores movement without a full wash.
Common glueless wig problems and how to fix them fast
Most issues have a 2–5 minute fix. Here are the ones that come up most often:
Slippage (wig shifts during the day) Add a silicone wig-grip band between your wig cap and the wig. Tighten the elastic band one notch. If the issue persists, check that the front combs are fully pressed into the cap.
Visible lace (lace line shows at the hairline) Dab a concealer or foundation slightly lighter than your skin tone along the lace using a makeup sponge. Pre-plucked hairlines blend faster. For a longer fix, use a lace tint spray matched to your skin tone.
Frizz and tangles Detangle with a wide-tooth comb from ends to roots while the hair is damp. Apply a small amount of leave-in conditioner or anti-frizz serum. Sleep on a satin pillowcase or in a satin bonnet to prevent overnight friction.
Pressure headache Loosen the elastic band immediately. A properly fitted glueless wig should feel secure, not tight. If the band is at its loosest and still causes pressure, the cap size may be too small.
Pro Tip: Before bed, loosely braid or twist the wig hair and cover with a satin bonnet. This single habit prevents the majority of overnight tangling and frizz.
How virtual try-on helps you choose the right glueless wig style
Buying a wig without seeing it on your face is a real gamble. Hairline placement, density, and part style all look different on different face shapes. Virtual try-on removes that uncertainty before you spend a dollar.
Stylemycrown is built specifically for Black hair textures, with over 528 curated hairstyles and 10 complimentary try-on credits so you can experiment risk-free. The platform lets you preview lace visibility, part placement, density differences, and baby-hair options on your own photo.
What you can check before buying:
- Whether a 13x4 or 13x6 hairline suits your face shape
- How 150% vs. 180% density looks on your specific features
- Whether a middle part or side part works better for your face
- How baby hairs frame your forehead at different lengths
- Which textures (straight, wavy, curly) feel most like you
How to use Stylemycrown's try-on:
- Upload a clear, front-facing photo with your hair pulled back.
- Browse the Style Catalog and filter by texture, length, and cap type.
- Apply a style to your photo and preview the hairline and density.
- Try multiple densities and parting options using your complimentary credits.
- Save the looks you love and use them as a reference when shopping.
Seeing a style on your own face, at your actual hairline, with your skin tone as the reference point, is the single most reliable way to know whether a wig will work for you before you commit to it. That is what we built Stylemycrown to do.
The fastest wins for beginners are also the most underrated
There is a tendency in wig content to push beginners toward complex installations before they have the basics locked in. We think that is backwards.
The half-up half-down, the low bun, and the headband wrap are not "starter" styles you graduate out of. They are genuinely versatile looks that work on any occasion, require minimal tools, and put almost zero stress on your edges. A wear-and-go pre-cut lace unit in a half-up style looks just as polished as a full install, and you can do it in 10 minutes flat.
Where we do recommend visiting a stylist: custom hairline work, lace tinting for very light skin tones, and first-time Bantu knots on a full-lace unit. Those are the moments where a professional's eye saves you time and protects the wig. For everything else, the steps in this guide are enough to get you there.
Try a look on Stylemycrown before you buy. Seeing the hairline on your own photo changes how you shop.
See your glueless wig style on your own face before you buy
Most people pick a wig based on a model photo and hope for the best. Stylemycrown gives you a better option: preview the exact hairline, density, and texture on your own photo using augmented reality built for Black hair.
With over 528 curated hairstyles and 10 complimentary try-on credits, you can test a sleek straight look, a high ponytail, or a full curl set before spending anything. Check whether a 13x4 or 13x6 lace front suits your face. See baby-hair placement at your actual hairline.
Browse the Style Catalog to find looks matched to your texture, length preference, and parting style. When you are ready to go deeper, the Stylist Catalog connects you with professional inspiration for more complex installs. Start with your free credits at Stylemycrown and know exactly what you are buying before you buy it.
Sources
- Glueless Wigs, Everything to Know | Unruly
- 10 Easy and Stylish Glueless Wig Hairstyles for Every Occasion
- Glueless Wigs HD Lace Front Wear And Go for Beginners